craft projects

Easter Bunny DIY

Happy Easter! If you're looking for a fun and easy project to do with the kids, then look no further than this paper Easter bunny tutorial. Not only is this craft adorable and festive, but it won’t cost you a fortune in eggs (what’s up with these crazy egg prices anyways?!).

Supplies:

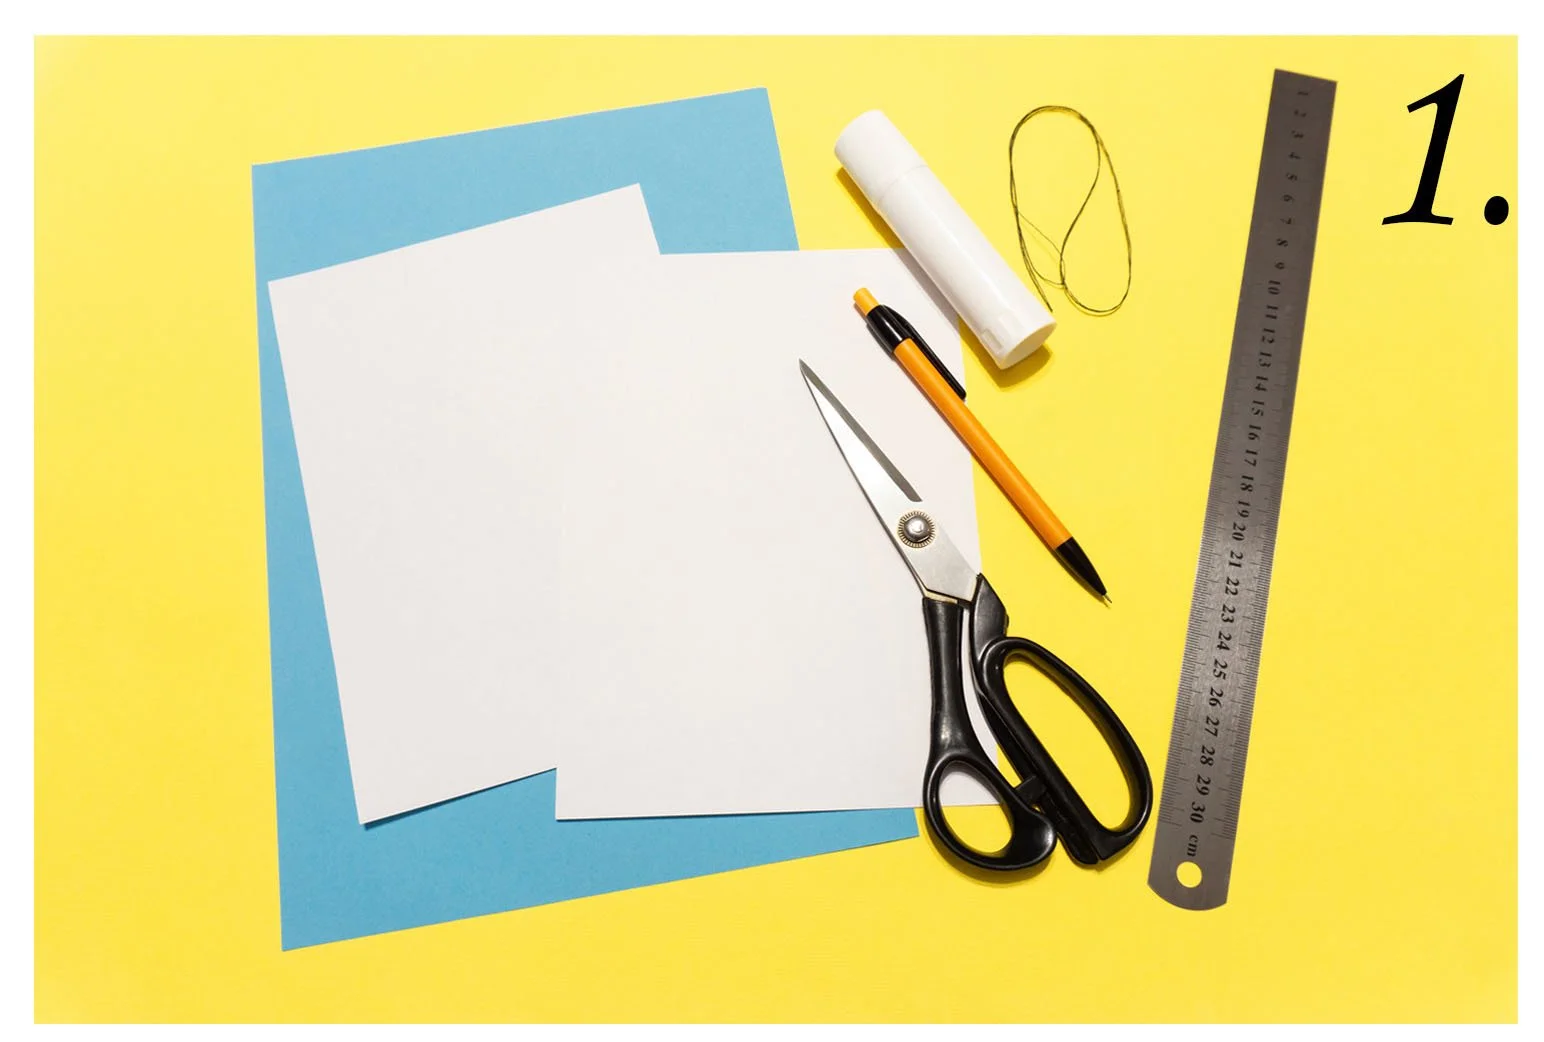
  • 3 Sheets of white paper for the bunny’s body

  • 1 sheet of color paper for the bunny’s ears, nose, and feet

  • Scissors

  • Ruler

  • Pencil or black marker

  • Twine or thread

  • Glue stick


Let’s Get Started!

Step 1: Gather your supplies and take your two sheets of white paper and cut them into 8” squares.

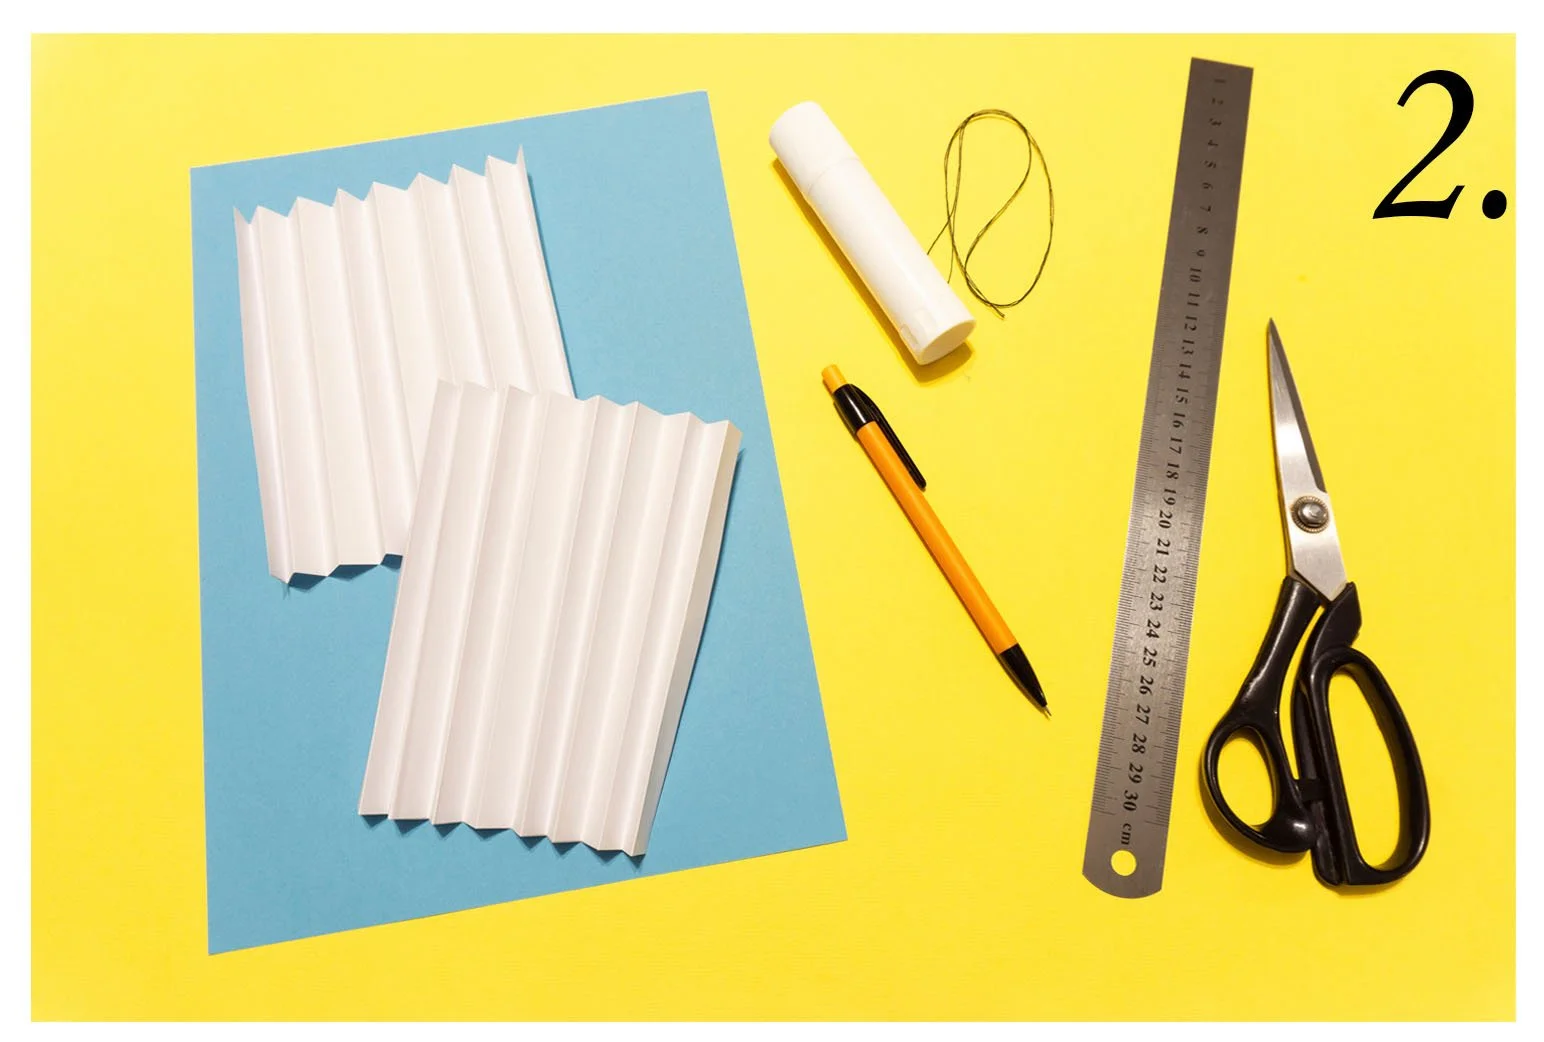
Step 2: Using your ruler fold the both pieces of white paper accordion/fan style in 1/2” sections.

Step 3: Put glue on one end of each piece of accordion paper

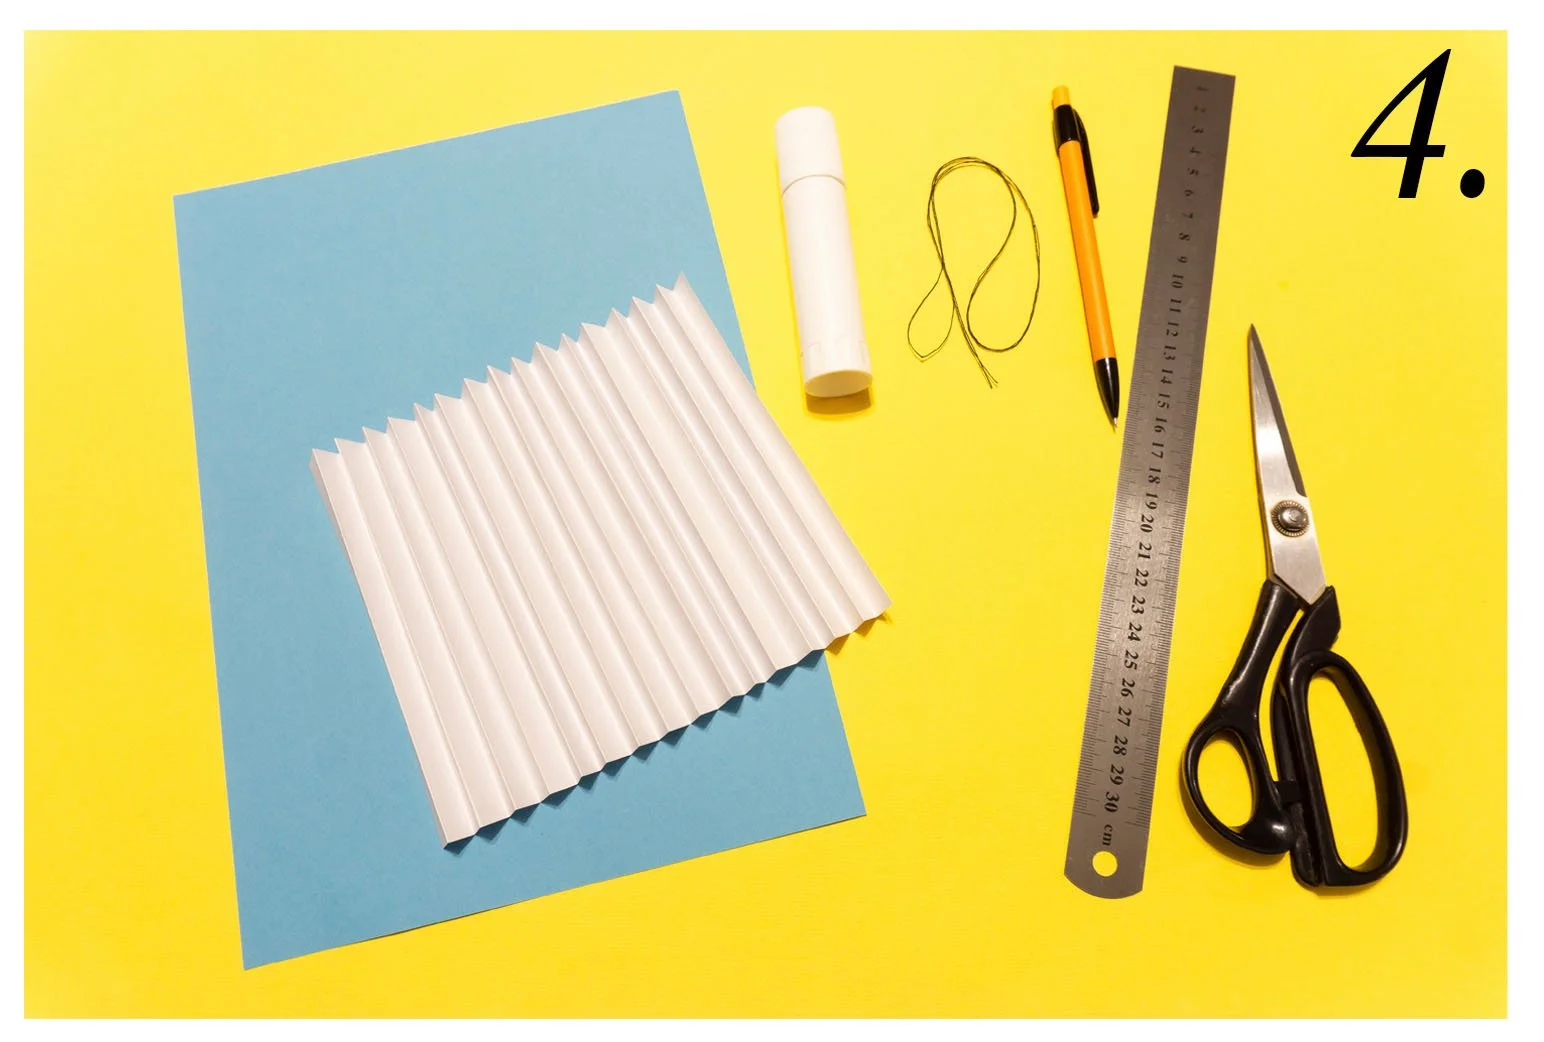
Step 4: Attach the two individual pieces of paper together to make one longer accordion style piece of paper.

Step 5: Use your ruler to mark the middle (4”) of the paper, and take your twine or string and tie it around the paper to cinch it in the center.

Step 6: Use your glue stick to attach the flat ends of the paper fan to each other, forming a circle. This will be your bunny’s body.

Step 7: On your remaining piece of white paper, draw and cut out the bunny’s ears, eyes, nose, and feet. Then taking your color paper, draw and cut out smaller ears, and circles or hearts for the bunny’s toes and nose.

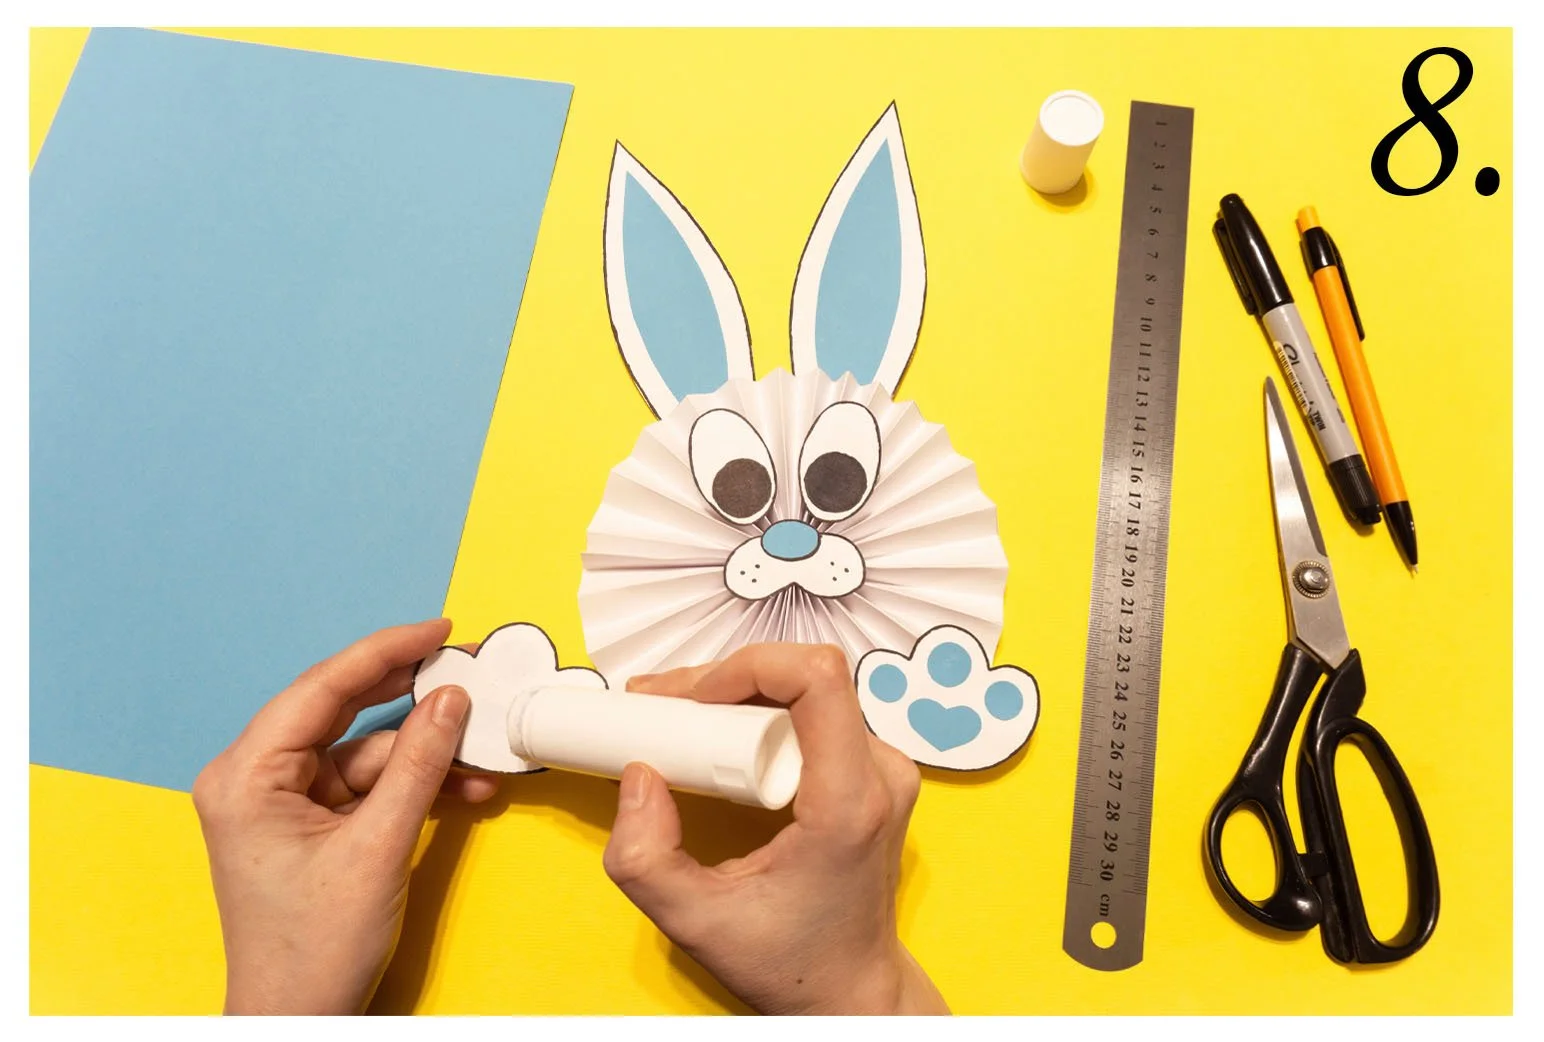
Step 8: Use your glue stick to attach the color paper bunny parts to the white pieces. Then glue the bunny’s ears, eyes, nose, and feet to the body.

Step 9: Using a marker, color in the bunny’s eyeballs, and some whiskers on it’s nose. For some added fun, you can glue a cotton ball to the back for a tail.

This paper Easter bunny tutorial is a fun and easy craft that's perfect for the whole family. With just a few simple materials, you can create a cute and festive decoration that will brighten up your home this Easter. So, grab your paper, glue, and scissors, and get ready to craft your way to a hoppy Easter!

Heart Origami Tutorial

If you are new to origami this origami heart tutorial is super easy and a fun and comes together quickly. It is great for anyone to try and is also friendly for tiny hands too.

What you’ll need:

  • Square piece of paper - That’s it!

You can use origami paper if you have it on hand, but I have found that wrapping paper works really well and adds fun colors and designs, but even a post-it note will work!


Step 1

With the color/printed side of your paper facing down, rotate your paper so a corner is facing up (like a diamond) and fold your paper corner to corner.

Rotate it 90 degrees and fold corner to corner again.

Oragami heart step 1 fold paper corner to corner

Step 2

Take the top corner and fold the tip down to the center where the two folds meet.

Step 3

Take the bottom corner and fold it about halfway past the center where the two folds meet and the corner overlaps the last fold you made.

Step 4

You should now have a piece of paper that looks a little like a crystal laying on it’s side. From here you are going to take each side and fold your paper so the bottom edge lines up with the center fold.

You should have somthing that resembles a “V” now.

Origami heart 4 fold bottom edge to center fold

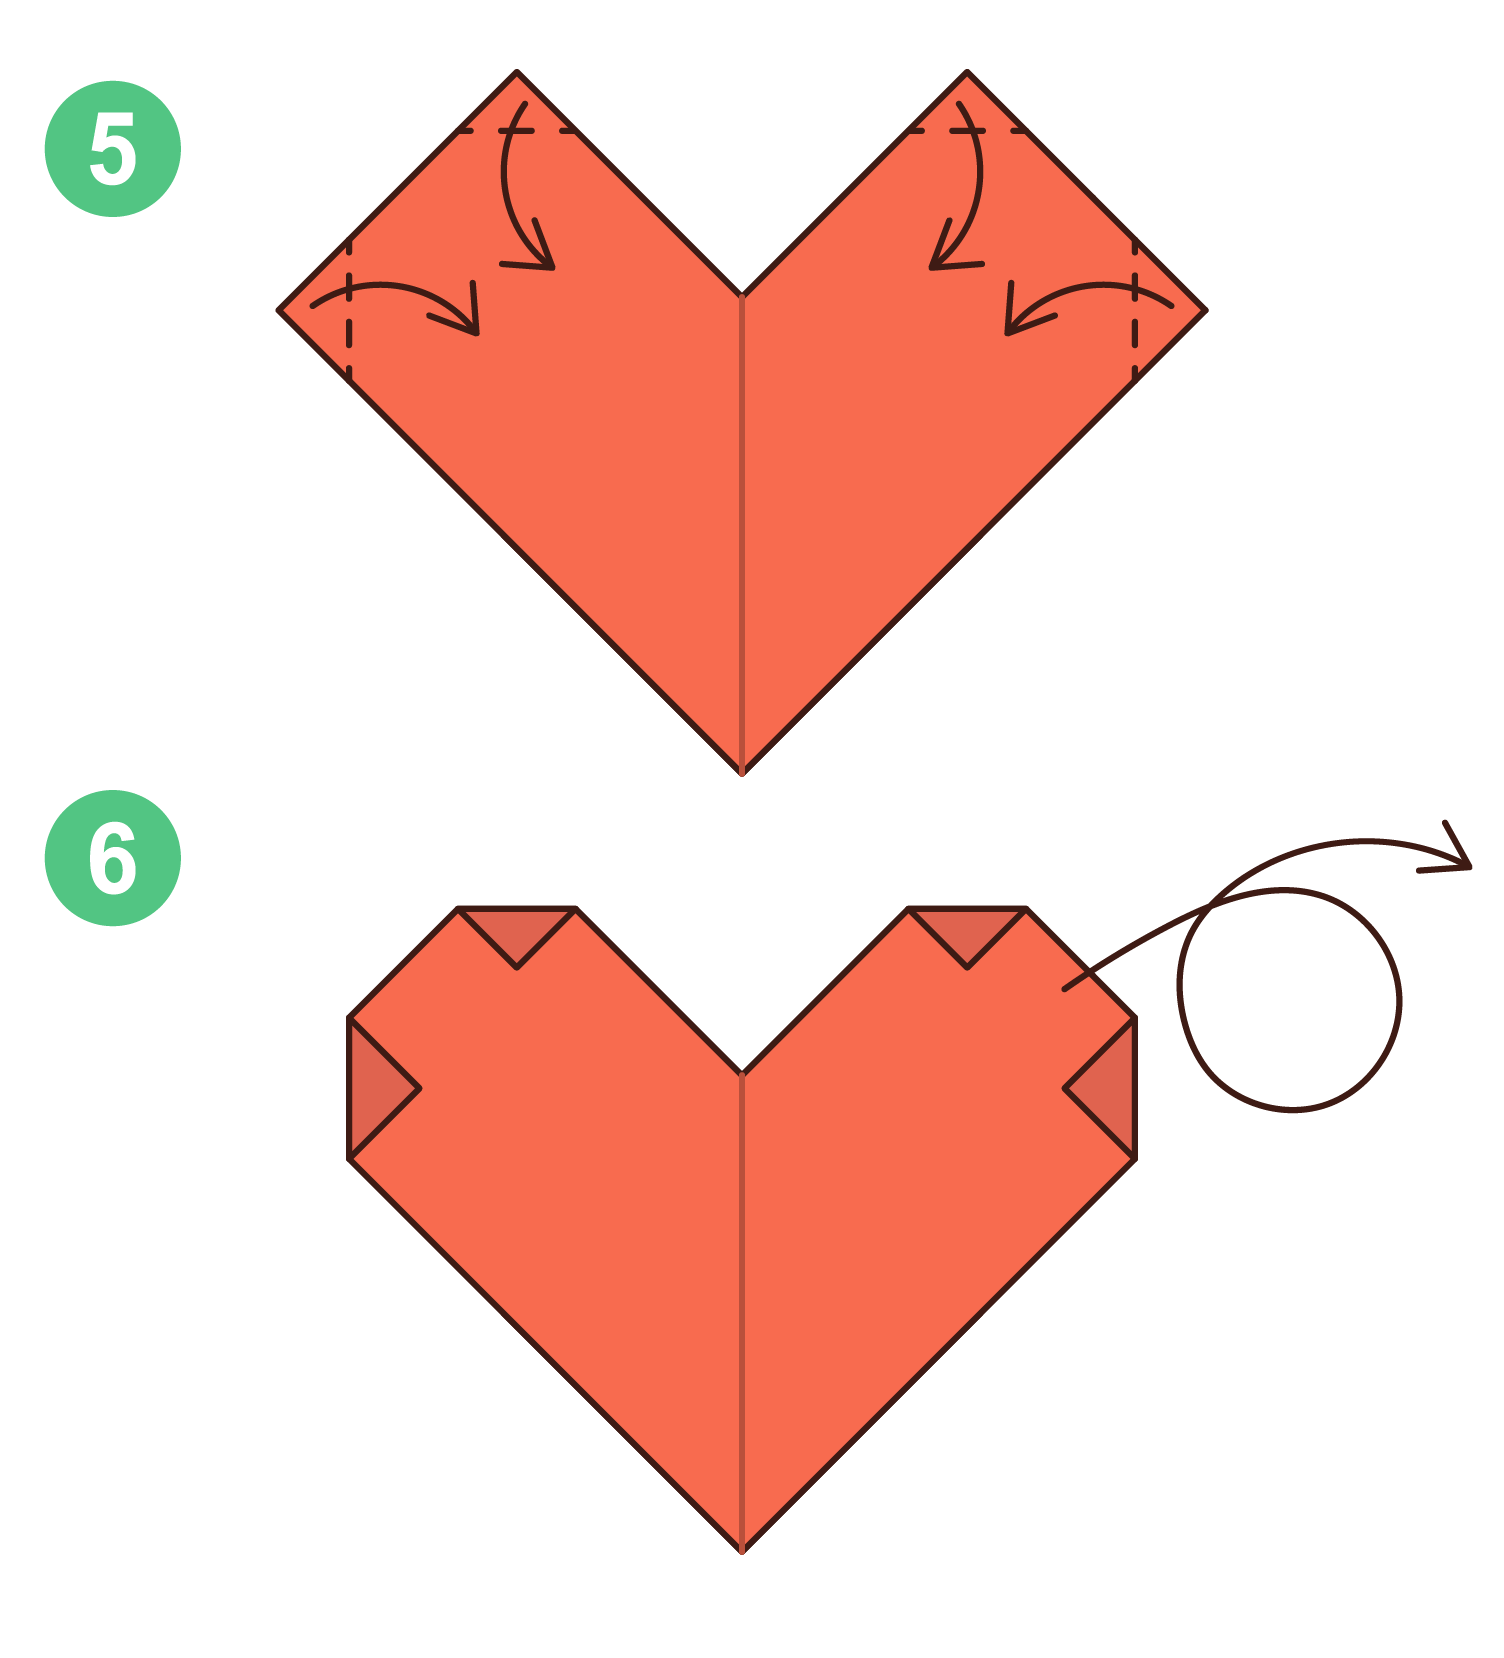
Step 5 - 6

Fold back all of the corners at the top of your “V” shaped piece of paper to round them out.

When you flip your paper over it should look like the diagram in step 6.

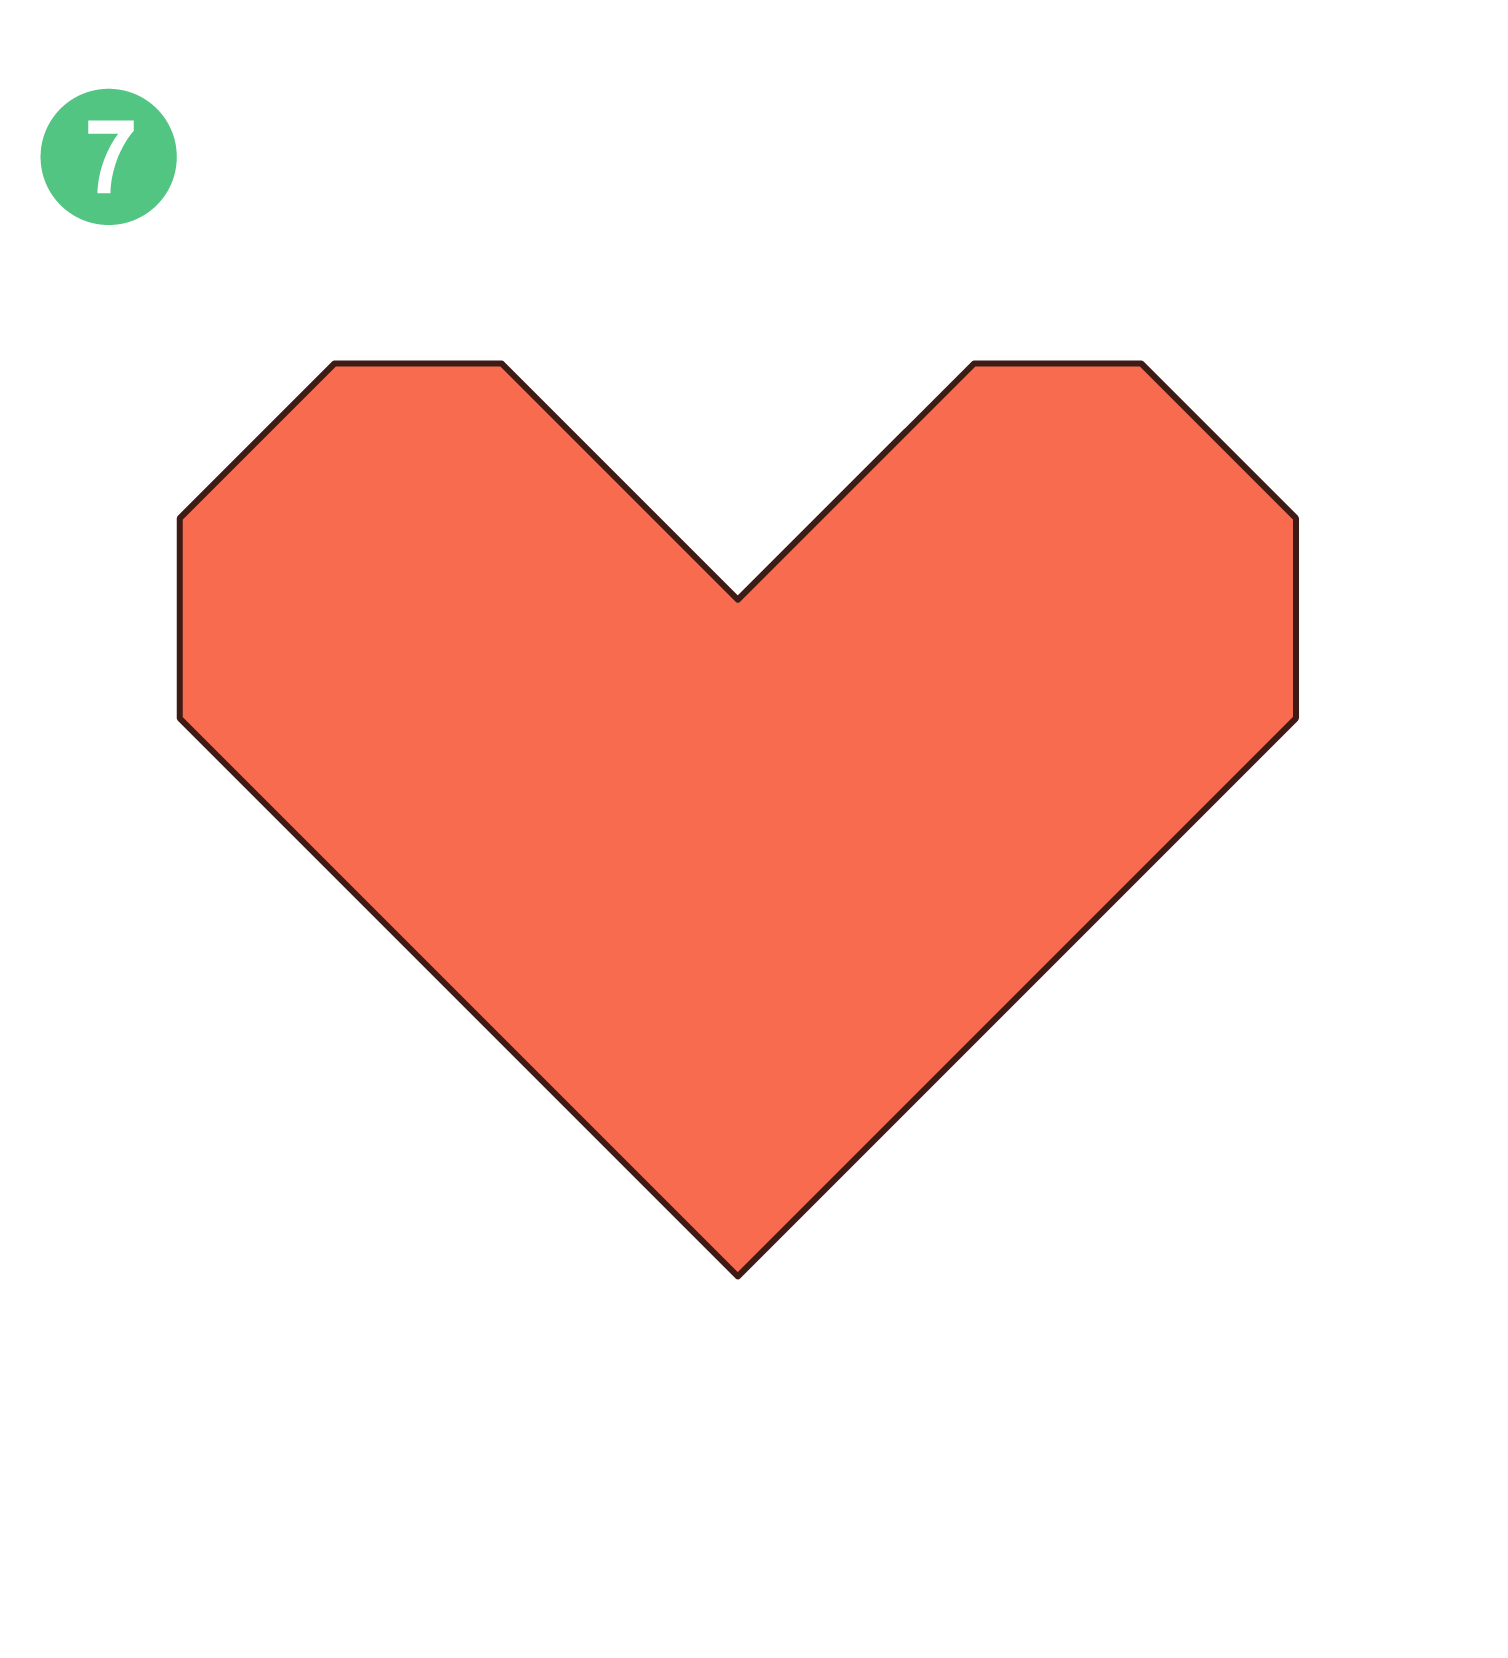
Step 7

Flip your paper back over and your heart should be complete. You can make more and change up the sizes or paper colors/patterns to get a variety of hearts.

Once you have a couple of hearts you can string them together to make some garland, you can put little notes inside them (think fortune cookie style), put them in your kids lunches, or just use them to decorate a table or wall!

DIY sugar skull tutorial

We love this sugar skull DIY from Emily of MushTushy. We are excited to share this with you in time for fall, Halloween and Dia de los Muertos. This tutorial is so fun.

The cool thing about this project is that you can pick anything to paint, whether you want to use a piggy bank, an animal statue or even salt and pepper shakers such as the ones we used here. The options are limitless. For this tutorial, I bought little ceramic salt and pepper shakers from Target for $3 each. The only other supplies you will need are:

- paint pens (my personal favorites are fine point Sharpie oil based ones from Michael's or JoAnn's; be sure to use your coupons too!)
- flat white spray paint primer (my favorite is Rustoleum painters touch 2x cover from Walmart or Home Depot)
- pencil/eraser
- gloss varnish (my favorite is Liquitex gloss medium and varnish from JoAnn's)

I always suggest priming your store-bought statues in order to get the paint to properly adhere. So even if you have a white object, be sure to prime it first, unless it's flat matte white. Be sure to use one thin coat in order to avoid drips, peeling paint and longer dry time. I always try to wait at least a few hours or even overnight before attempting the next steps. 

Once your statue is dry, you can begin drawing your shapes and patterns. The only part I draw on is anything that I want to stay white. For example, for sugar skull patterns with bones, I outline the bones. If you feel more comfortable drawing out your entire design, feel free to do so. But remember the pencil will likely show through your lighter paint colors. Pencil can be erased from the primed surface, so don't be afraid to experiment with designs before using the paint pens.

Look up sugar skull designs, henna patterns, mandala art or any patterns. You can even add words to customize your project. The options for decorating are only limited to your imagination. After I block in the white areas with pencil, I draw my patterns and shapes with the markers. 

Once all your white is outlined and you've filled in the colors, the tedious work begins. Be sure to have a steady hand, and maybe don't attempt this after your 5th coffee of the day. Haha! Use the fine point black Sharpie and start outlining all the shapes with black, and then go back in with the thicker black Sharpie to fill in the remaining background. Once all the black is drawn on, touch up any color areas that have white splotches and then brush on the clear varnish. Don't put it on too thick and don't brush repeatedly in the same areas or color can pull off and the clear may dry a cloudy white.

After it dries, you have your beautiful hand-painted statue ready for display on your mantle, desk, entryway, etc. I hope you have enjoyed this tutorial. Please feel free to follow me on Instagram and share photos of your completed projects! 


Etsy Dallas teams with NorthPark Center for 4th annual Crafts for Crayons event

We are hosting our 4th annual Crafts for Crayons school supply drive and craft event at NorthPark Center from 1-5 p.m. on Saturday, August 26. Find us in the NorthCourt between Nordstrom and Macy's.

We have fun crafts ready for kids and adults. Just stop by with supplies and donations. "School is starting for so many kids but nearly one in three children in Dallas County cannot afford basic school supplies," Etsy Dallas member Jenny Abney Sivie said. "Crafts for Crayons is a fun afternoon of crafting that also raises supplies and donations for kids to have a better start to the school year."

All donations will go to Girls Incorporated of Metropolitan Dallas, a non-profit organization whose mission is to inspire girls to be strong, smart and bold through life-changing programs and experiences that help girls navigate gender, economic and social barriers. Research shows that empowering girls and women yields benefits for entire families and communities, but many girls face gender stereotypes, narrow expectations, and negative media messages. With support from our communities, young girls can learn that they are strong and can achieve whatever they want in life. 

Not sure what to bring? Girls, Inc. is in need of school and art supplies such as paper, crayons, scissors, pencils, pens, glue, markers, and erasers, as well as sports equipment, games, books and more. Everyone is invited to come out, make some crafts and support this supply drive. Every little bit helps!

Sponsor Spotlight: DFW Fiber Fest


Not only will DFW Fiber Fest be organizing a make-and-take craft project the day of The Jingle Bash, but they are also a sponsor of this year's bash. We are happy to have them join us since we're both all-volunteer led organizations focused on promoting handmade artists.

Since the spring of 2006, DFW Fiber Fest has produced an annual show to support the knitting, crochet, and spinning craft community in North Texas. Their aim is twofold: to provide an educational venue (think lots of awesome classes!) and a well-curated vendor hall (think lots of pretty yarns and fibers to pet and purchase!) for fiber enthusiasts of all skill levels.

The 2014 lineup of instructors is phenomenal. National headlining artists such as Stephanie Pearl-McPhee and Patty Lyons and special local and regional teachers will make the weekend of March 28-30th full of fiber and fun. Classes start around $30 and you can also buy weekend passes. Each class is marked for skill level so from beginner to expert, you're sure to learn something whether you're just starting out or if you'd like to learn an exquisite new technique.

Stop by their website to learn how you can register for classes and also pop by and say hello this Saturday. DFW Fiber Fest Make-and-Take and Information table will be in Walker's Workshop, the indoor boutique space at The Shops at Park Lane.