estieMade

Shop Spotlight:EstieMade

Another Monday, another Shop Spotlight post! This week, we're featuring Etsy Dallas Team Member EstieMade. Esther Kao, owner and designer, creates unique, modern, and versatile jewelry pieces that will last you a lifetime.

EstieMade Aquamarine Half Moon Ring

What year did you start your shop? 2011
What is your shop's motto? Simple + wearable jewelry that is elegant enough for everyday wear.


EstieMade Dainty Tourmaline Rope Ring

What is your favorite item that you sell? Rings!
Fun fact about you: I rarely buy clothes - I spend my money on jewelry supplies instead!

EstieMade Geometric Stacking Bracelets

How did you get started? My first jewelry pieces were necklaces for my bridesmaids in 2009, and from there I got hooked on making jewelry. 


EstieMade Hand-Textured 14k Gold Stacking Rings

Anything else we should know about you? I have a background in graphic design and advertising, which has come in handy for developing my Etsy shop and branding.

EstieMade Triangle Malachite Necklace

Thank you so much, Esther! Your pieces are truly beautiful, and we're proud to have you on the team!

If you would like to know more about EstieMade, you can check out her other social media sites. And I definitely would, if I were you - she's usually posting some killer sneak peeks of upcoming designs and behind-the-scenes shots of her process!


Freshly picked finds for spring

It's official: Spring has arrived. Here are some fresh picks from the Etsy Dallas team to brighten up your world. Now it's time to kick back with a tall glass of iced tea and enjoy the sunshine.


 Hand Painted Floral Folded Greeting Card by Magnolia Tree Paperie


 Dainty Pendant Necklace by estieMade


Handmade Glycerin Soap Green Butterfly by The Pig And The Peacock


Pop-up Shop at Pouf


Our long-time Team Etsy Dallas fans will remember distinguished alumna, Maryam, the creative force behind the lifestyle blog and shop Pamplemousse1983. She’s recently put her blog on hiatus, and closed her cutie pie Etsy shop some time ago, but she hasn’t been sitting idle, that’s for sure.

Together with her business partner Nas, Maryam opened Pouf at the end of April. Pouf is Mockingbird Station’s best blowout spot—and I daresay the best in Dallas. This jewel box blowout salon is so luscious it makes you want to move right in or at least schedule a weekly appointment. It’s luxurious, stylish, and locally owned: three of our favorite words here at Etsy Dallas.

So when Maryam contacted us about hosting a Pop-up Shop at Pouf, we said yes so fast our perfectly-coiffed tresses shook. (Okay, when she called, our tresses were not perfectly coiffed, but they will be when you see us next because we booked an appointment ASAP.)

On Saturday, August 17, 2013, from 3-7pm, Pouf and Etsy Dallas are hosting a Pop-Up Shop featuring five Etsy Dallas artists, carefully curated by Maryam to reflect the vibrancy of her Pouf clients.

Pouf Blowout Salon


We hope you’ll join us on Saturday and pop in for some shopping and maybe some ‘do la la! Check back tomorrow for feature on the five Etsy Dallas artists who'll be joining us on Saturday (K8 Made, The Freckled Chicken, YLK Photography, estieMade, and Silla Soup). 

You'll look fabulous, dahling! 
--Jenni

Hello, Summer!

A few finds to sweeten your summer. 

Mer-Jack Ladies Tee by Dowdy Studio
Sweet Citrus and Lavender Body Scrub by The Pig and the Peacock
Obsidian and Coral Chevron Necklace by estieMade
Travel Laundry Bag by Jenni20 Designs
Red Bicycle Notebook by MadebyRori
Blue Yonder Photographic Print by YLK Photography


Weekend Guide: May 30 - June 1st

Design District Market

DateThursday, May 30th
Time: 6-10pm
Location: 300 Cole St. Between Dragon and Slocum, Dallas 
Participating Etsy Dallas Members: Regal CottageDowdy StudioestieMade


Etsy Pop-Up at West Elm

Date: Saturday, June 1st
Time: 1-6pm
Location: Mockingbird Station, inside West Elm store 
More Info: West Elm blog
Participating Etsy Dallas Members: YLK Photography, Honeycomb Print Shop


KXT's Summer Cut

Date: Saturday, June 1st
Time: 4pm+
More Info: KXT's Summer Cut website
Participating Etsy Dallas Members: Dowdy Studio


For the love of mom

There's so much to love about the special women in your life--the moms, grandmas, aunties, and other ladies who give you so much love and encouragement all year long. 

And though there's absolutely no way one gift can really express just how grateful you are, I know a few ladies in my life who wouldn't turn a gift down! 

So in the spirit and loving and giving, we've curated just a few things in the treasury below from our artists and members--simple, thoughtful gifts that will let someone know in a small way just how much you really care. 

Click through, and you'll find gifts for the traveler, the gardener, the fashionista, the minimalist...


Gift Guide: Loveliest Wishes

Valentine's Day is just around the corner, and it's time to think about your sweeties. Today, Regina from Regal Cottage shares her loveliest wish list from the Etsy Dallas team. Hope her lovey dovey is tuned in...

Cotton and Linen Clutch by K8made
Love Parasol by DCimaginations
Heart Pocket Planter by Both Hands Studio
Violet Geode Slice Necklace by estieMade

Craft Blast from the Past: Puffy Paint Candleholder

Welcome to Craft Blast from the Past, brought to you by Esther from estieMade! When I think of craft supplies from my childhood, puffy paint seems like a staple. I remember making many puffy painted shirts from when I was young and even up to my high school days (for volleyball team spirit). I'm no longer glamming up my shirts with puffy paint, but I'd like to show you how an easy way to use it to make holiday candleholders. It's a fun way to dress up table settings during Christmas!

Materials -small jar (I used a mason jar) -puff paint -Ribbon -battery-powered tealight Steps Take your puffy paint and paint on a design. I found the paint came out most evenly when I squeezed the bottle gently. My mason jars already had X's all along the middle, so I just painted on top of these in different colors. I I alternated between a sparkly gold puff paint and a white one, and ended up with this design. Once you're done with your design, let the paint dry, then cut out a length of ribbon that fits inside your jar. You can glue the ends together if you'd like. Place your battery-powered tealight in the jar, and turn it on. Now admire your new candleholder! Hope you enjoyed this Craft Blast from the Past. Good luck with prepping for the Holidays!

Craft Blast from the Past: Washi Tape Magnets

Esther from estieMade bring us another installment in her awesome Craft Blast from the Past series.


Craft Blast from the Past is back! We're focusing on DIY magnets today. Remember making magnets when you were young? It usually involved gluing circular magnets to some kind of art piece we made, or using magnetic tape on the back of a photo. Today I'm going to teach you to make your own with washi tape and magnetic business cards. It's a quick and easy way to spruce up your fridge or office filing cabinet. I got the inspiration from this tutorial.


Materials
-washi tape
-business card magnets 
-cardstock 
-scissors


Steps
Peel the plastic covering off the magnets to expose the sticky side. 

Place the magnet onto the cardstock and press down firmly. Make sure there are no air bubbles between the magnet and cardstock. Then trim off the excess paper.

Place the washi tape parallel to one of the edges of the business card, then use your scissors and cut along the tape line. Lastly, cut the edges of the magnet. You can either do straight cuts, or you can cut zig zags to mimic the torn edges of washi tape.

Since washi tape is so thin, I thought it'd be fun make a couple magnets with colored paper underneath the tape instead of plain white cardstock. I used sheets from a paper sample book I had at home. (If you're in Texas, you can get these books free from Clampitt for free.)

Since I used pastels, the color underneath came out pretty subtle. I like how it adds just a hint of color to the magnet though. 

Like I said, this is a super-quick project. What will you use your washi tape magnets for?

Weekend Guide: October 12 + 13 + 14


Pegasus Plaza Market 
Date: Friday, Oct. 12th
Time: 11am - 2pm
Location: Main & Akard in Downtown Dallas
More Info:  http://dowdystudio.blogspot.com/2011/03/wheres-that-wagon.html
Participating Etsy Dallas Members: Dowdy Studio 


Arts Goggle
Date: Saturday, Oct. 13th
Time: 4pm-10pm
Location: Near Southside in Ft Worth (1207 W. Magnolia) 


Urban Street Bazaar

Date: Saturday, Oct. 13th and Sunday, Oct. 14th
Time: Saturday 12-8pm, Sunday 12-4pm
Location: Bishop Arts District, Dallas
More Info: http://makeitindiegenius.squarespace.com/urban-street-bazaar1/
Participating Etsy Dallas Members: Pamplemousse1983, estieMade, Dowdy Studio 


Product Spotlight: A Brave New World

Columbus Day this year is October 8th. Here are a few picks from the Etsy Dallas team to inspire your adventures.
Go & Be Daring art print by Honeycomb Print Shop

Morning at Sotol Vista art print by Seen Studios

Blue Quartz Branch necklace by estieMade

Hungry Blue Fish wall vase by Two Clay Hands

Super Ride Tee by Dowdy Studio

Make Christopher Columbus proud. Get out there and conquer the world!

Craft Blast from the Past: Wrapped Feather Pens

Hello! it's Esther from estieMade, with the fourth installment of Craft Blast from the Past. This series is all about taking an old school craft and using it in a new and modern way. The focus today is embroidery thread. Many of us (especially girls!) grew up making friendship bracelets and anklets with this stuff. There were a million-and-one ways to tie the brightly colored strings to make various kinds of bracelets. Now that we've grown out of making friendship bracelets, why not use that to wrap some pens? I found this wrapped feather pen tutorial from idlewife, and was inspired to make my own. Don't know about you, but I still had some floss left over from middle school at my parents' house. The feathers were purchased from Joann Fabrics a long time back. And the pens were spare ones from our drawer. So this was essentially a $0 craft.
steps /1/ Start by taking the gel pen cartridge from the casing. Measure your embroidery thread, making sure you have a long tail (it's better to have more than less!)
/2/ Check to see how the end of your feather fits into the pen cartridge. The feathers I used had ends that were taped with masking tape, which allowed the feather to fit snugly into the cartridge. If your feather end is too thin (i.e. falls into the cartridge), wrap the ends with a small bit of masking tape.    /3/ Tie one end of the embroidery thread around the taped end. Then put fabric or tacky glue all over the taped area, and insert feather into pen cartridge.

/4/ Start wrapping the pen, using the basic friendship knot. You'll want to work towards the pen tip.

Idlewife has this great "how to" video for how to do the wrapping:
 
To change colors, use the existing color to tie a knot to the new colored thread. Hold the old color close to the pen and wrap the new color around both pen and old color.

/5/ When you've reached the tip of the pen, bind off the thread. You can add a little dab of glue to the ends and secure it to the pen.
And you're done! What can you use your feather pen for? I think it'd look neat for signing a guest book at a wedding. Or perhaps for party favors. Maybe they could be just to spruce up your cubicle at work. The sky's the limit on this one!

Hope you will join us at our Craft Party for more DIY fun!

The Queen is my Hero

Queen Elizabeth proved to the world that she does indeed have a keen sense of humor when she "dropped in" to the 2012 Olympics Opening Ceremony by parachute!

Here are a few Her Majesty-inspired picks from Etsy Dallas:

Retro Floral Envelope Clutch by K8Made

Keep Calm and Carry On Notebook by MadeByRori

Shade of Purple Bunting by Three Yellow Starfish
Dainty Lace Cuff by estieMade

Crochet Teacup Ornament by Sheepish Knit Crochet

Vintage Scarf Pillow by Butter Design Lab

Be Courageous Letterpress Art Print by Honeycomb Print Shop
Three Cheers for the Queen!

Craft Blast from the Past: Sculpey Doily Bowls

Hello! it's Esther from estieMade, with the third installment of Craft Blast from the Past. This series is all about taking an old school craft and using it in a new and modern way.

Today, we focus on Sculpey. It's a bake-able polymer clay that you can buy at your local craft store. Some of y'all may have used this to make your own beads for necklaces growing up. Or maybe you made a 'plate' with an imprint of your hand on it to give to your Mom for Mother's Day in second grade. Fast forward a bunch of years, and this is what you can do with Sculpey now: make a little bowl for your jewelry. The inspiration for this came from this tutorial from Sodapop design. It’s in German, but the pics are pretty self explanatory. I translated the text using Google translator, and came up with this adapted tutorial. To start, I gathered my materials: bowling3-Sculpey clay (I got this at JoAnn Fabrics)
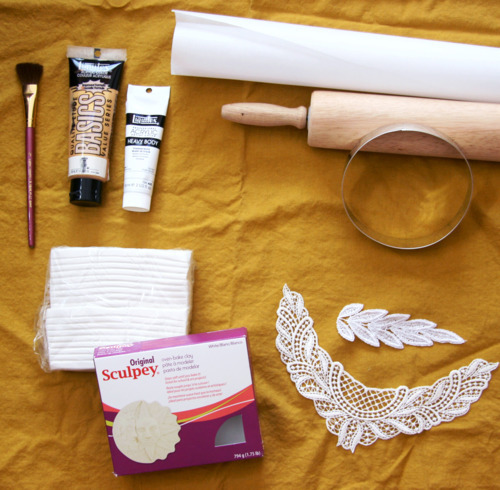
-lace to make your design (a paper doily works fine too)
-a cookie cutter (a cup works fine too)
-rolling pin
-either wax paper or a silipat to roll the clay on
-acrylic paint (optional)

Steps First, roll out the Sculpey onto the Silipat (or wax paper). Make sure you roll the clay out evenly, so that the entire piece is the same depth (about .25"). (By the way, don’t roll your clay out directly on the counter, or you will have to restart. I made that mistake, and couldn’t scrape the clay off the counter without ruining the design.) bowling4
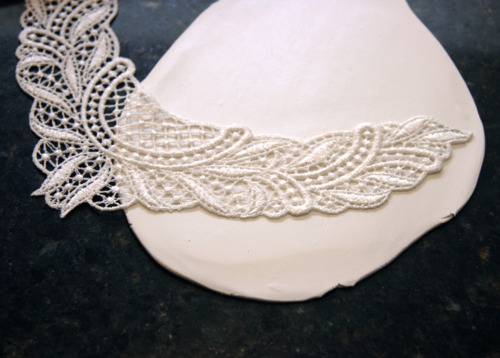
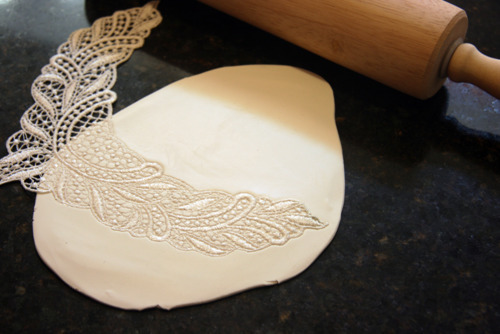
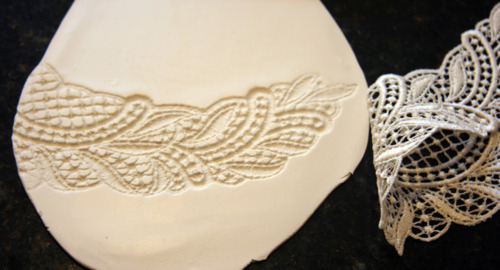
 Then roll the lace into the clay. bowling5
 Carefully peel back the lace. bowling6
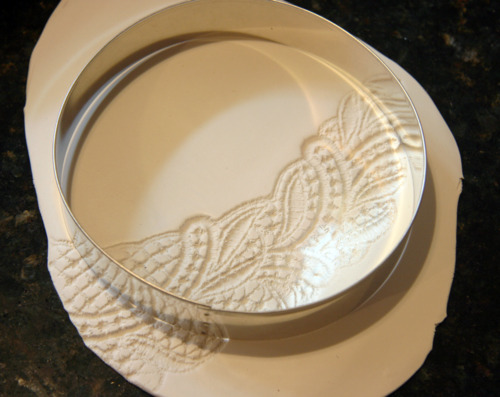
 Use your cookie cutter to cut the clay into a circle. bowling7
Next, peel the clay circle off the Silipat, and put it into a oven-safe bowl. I didn’t want the finished bowl to be too deep, so I used a shallow one. bowling 11
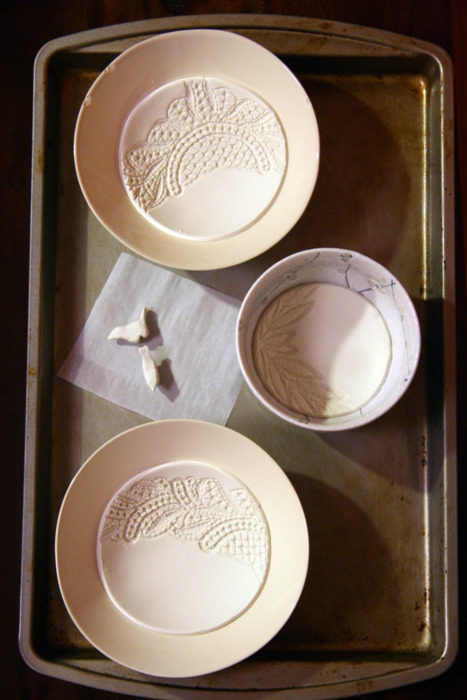
The oven-safe bowls went on a cookiesheet, and were baked. I just followed the baking instructions on the Sculpey packaging. After they were done baking, Let the clay cool in the bowls. bowling12
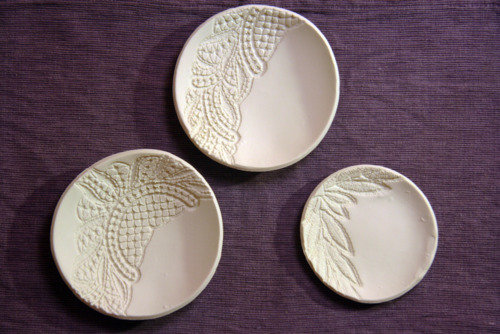
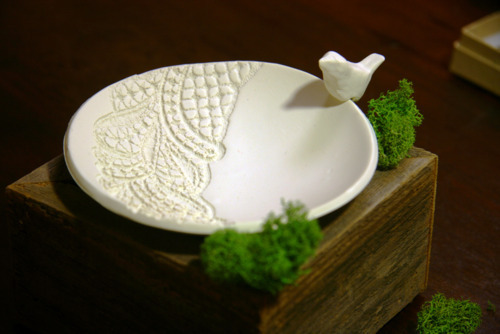
Now for the finishing touches. I ended up making a little birdie to perch on the lip of one of the bowls. To make it easier to glue the bird to the bowl, I cut out a little triangle of clay from the bottom of the bird. This was baked standing up, at the same time as the bowls. bowling9
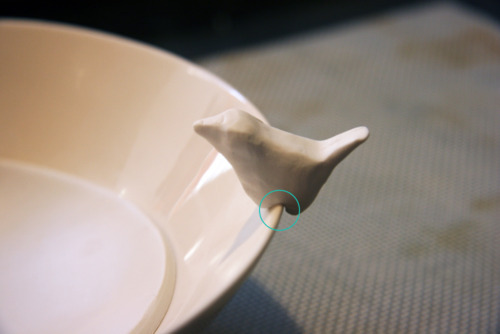
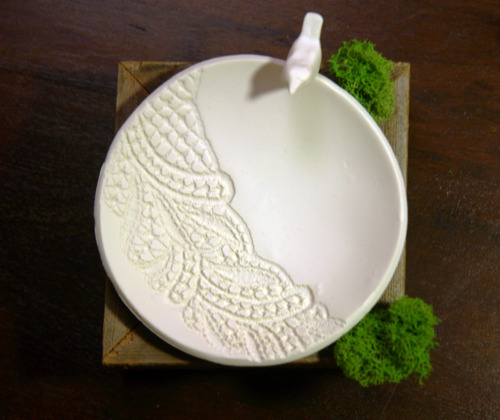
I attached the little bird I made to the lip of one clay bowl.bowling1 bowling13
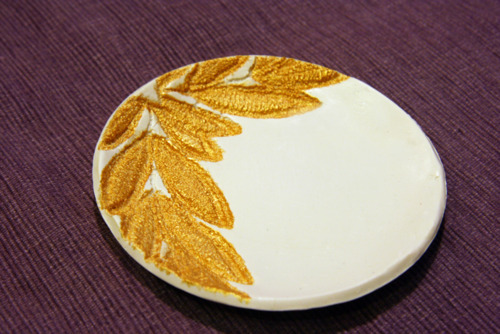
On another bowl, painted it with two coats of gold acrylic. Had to use a small brush to do this, for more precise painting. bowling14 bowling15
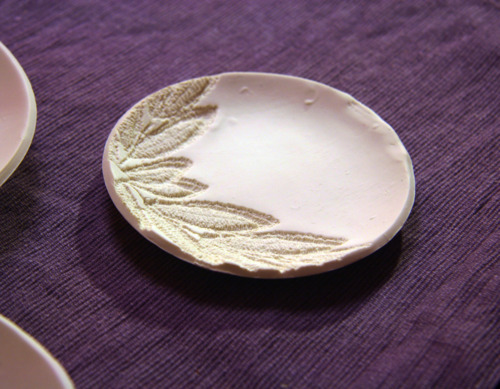
I ended up using this as my business card holder at last year's Handmade Bash. bowling16
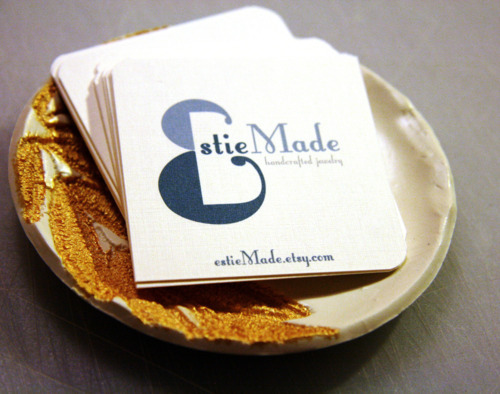
These bowls are pretty versatile – and they look pretty good, for being made out of Sculpey!

Big Ideas for Little Ones-Yellow and Gray

One of the hottest trends when designing nurseries for boys, girls or delivery surprises is the color combination of sunny yellow and cool, neutral gray. Etsy Dallas members present eight creative ways you can liven up a baby’s space so it is ready for sleepy, cloudy days or the bright, Texas sunshine.

Honeycomb Print Shop
Your little one will be dreaming of North Pole adventures thanks to this sweet penguin with an inspirational message we can all appreciate. Each print is hand inked, so the colors may be varied, but will all fall in the gray, marigold, black and cream families.


Pamplemousse1983
Scrabble letters spell out the title of George Harrison’s Beatles classic “Here Comes the Sun” on a cheerful yellow background dotted with white, and you can’t help but sing along. This original photo is printed professionally on archival paper to frame on your walls.


estieMade
Available in gray or honey, these personalized monograms can celebrate your new favorite name with modern vintage style. The 8-inch hoop can be used in the baby’s room or later in your study or office.


Dowdy Studio
Whether baby slept through the night or kept you up, you can still greet your day in style with this cheerful “Hello Day” print.  Each print is carefully made by the husband and wife team at Dowdy Studio from start to finish and is digitally printed on heavy weight matte photo quality paper.


Midnight Snack
There’s nothing cheesy about the way this adds a little yellow and gray to a nursery! You and your little mouse can read books or play on the floor with this 18-inch square pillow. Its backside has a funky, navy blue, khaki and green circle and square pattern as well.


Dowdy Studio
“Yeeeee haw!” This pen and ink illustration is the perfect addition to a room for a young Texan. The whimsical design with fine details like a bandana print and lines in the kitty’s straw hat is printed digitally on heavy weight matte photo quality paper.


Butter Design Lab
While you’re falling in love with the new bundle of joy rocking in your arms, your back will appreciate the soft support of this 18” x 18” screen-printed pillow. Metallic gold letters in gray suiting on one side – cool plaid on the other.


3dot4
This print packs a punch with bold gold and black, along with red and white accents. Your little one will enjoy counting the circles and numbers with you down the road, too.


Local Honey
Your new main squeeze will have you feeling like you’re living on cloud nine – so why not throw in a pillow to shout it out? Toss this 12” x 16” bit of handcrafted fluff on your rocking chair so you always remember this feeling. The back is made of collected fabric scraps, so you can make a special request to match the rest of your nursery.

Posted by Meredith from Meredesigns

Craft Blast from the Past: Glitter Stickers


Hi, this is Esther from estieMade, with the second installment of Craft Blast from the Past. This series is all about taking an old school craft and using it in a new and modern way.

Today, I'm bringing back glitter. We all know it from grade school: tiny squares of sparkly fun that seem to get everywhere. The supplies we used in our younger days were glitter + Elmer's glue + construction paper. And if we wanted to get extra fancy, we'd use the multi-colored stuff!

I've been wanting to make my own glitter stickers after seeing a tutorial on Creature Comforts. Making these is similar to the glitter crafts from childhood, but you use super fine glitter and spray adhesive.

Here's what you need:


You want to use 'extra-fine' glitter. The particles are teeny tiny, compared to regular glitter, which makes the project look more sophisticated when you're done. I found this brand at Michael's; Martha Stewart also makes a line of extra-fine glitter, if you're interested.

Here's what you do:
one
Peel off the outer edges of the sticker sheet, so you're left with just the stickers.


two
You will need two brown shopping bags: one for spraying the glue and one for the glitter. This makes for a super-easy cleanup. Place stickers in one bag, then evenly spray the sticker sheet.


three
Carefully transfer the sprayed sticker sheet to the other bag, then liberally sprinkle glitter on, till the sheet is evenly coated. Then take it out of the bag and let it dry. Once the adhesive has dried, your stickers are done and ready to go!

When I did this, I could still see the sticker designs through the glitter after my first round, so I sprayed and glittered twice. The second round gave them a solid coating, but the downside is that the spray glue solidified into a single sheet and made the stickers hard to separate from the non-sticky area. That meant messy edges on my stickers. It's just something to be aware of.

So now that your stickers are done, you can use them to add a little sparkle wherever you need it! I put mine on cards, including this Mother's Day one (embellished with markings from my pencil eraser stamps.)


The animal stickers were my faves.


I also used the glitter stickers on packaging. It's a nice way to spruce up gifts, goody bags, or Etsy packages.


So there you have it: a quick and classy way to use glitter!

Hope you have fun, and stay tuned for next month's Craft Blast from the Past!

Craft Blast from the Past: Eraser Stamps

Hi, this is Esther from estieMade, kicking off a series called Craft Blast from the Past. The series is all about taking an old school craft and using it in a new and modern way.
Today's topic? Turning erasers into stamps! Remember how we used to use potatoes in grade school and carve them into stamps? Well, this is pretty much the same thing, except you use erasers instead of potatoes. This is a easy and cost effective way to spice up a card (Mother's Day is coming up), gift wrap, or packaging. Plus, you can reuse the stamps you make for a long time. To make your stamps, you will need: 
-no.2 pencils with new/unused erasers 
-X-acto knife 
-ballpoint pen 
-stamp pads 
-paper, or something else to stamp on 
-a damp paper towel

step one Take your ballpoint pen, and draw out the desired stamp shape on your eraser.
I made a triangle and a heart. *I also tried doing this on the big white eraser you see in the images above, but it didn't work out for me. The erasers were too porous for the stamp pads I had, and the shapes that I stamped out looked more like blobs than hearts. Perhaps I should try with a larger design or a different kind of eraser next time.

step two Using your x-acto knife, carefully cut the excess eraser away, leaving just your shape.
You'll want to cut down to the base of the eraser, where the metal piece is. I made the heart by cutting right angles to get the general shape, then shaving down little pieces of eraser to give it a more rounded shape.

step three Admire your fancy work. Then bust out the stamp pads. It's time to go stamp happy! Make sure your damp paper towel close by, so you can wipe off the stamps when you switch colors.

I ended up making a bunch of different patterns using my stamps, then went back with a Micron pen to add accents. I thought this one (below) would make a cute name card for a dinner party. (Or in my case, a tea party that has pb&j.)
So there you have it – the first Craft Blast from the Past. The more you use the stamps, the more ideas you come up with. I promise!

If you're interested in seeing more tutorials, stop by my blog.